
La jardinière en macramé

DIY Decor: How to Create Macramé Plant Hangers for a Vintage Touch

Published on: May 15, 2026
Tags:

How to Create Macramé Plant Hangers for a Vintage Touch

Macramé is a beautiful way to add a warm, handmade, slightly retro touch to your decor. With a few lengths of cord, a ring, and a bit of time, you can create a lovely hanging planter to showcase a plant, a small vase, or a cachepot.

In this tutorial, we’ll show you how to make an easy macramé plant hanger, perfect for beginners. This project takes about 30 minutes and can be adapted with different cord textures, yarns, or even decorative beads for an even more personalized result.

Whether you love boho interiors, natural decor, or 70s-inspired style, this macramé plant hanger is a simple, quick, and truly enjoyable project to make.

Difficulty level: beginner
Making time: about 30 minutes
Perfect for: adding a decorative touch to your home, making a handmade gift, or getting started with macramé


Materials needed

To make this macramé plant hanger, you will need:

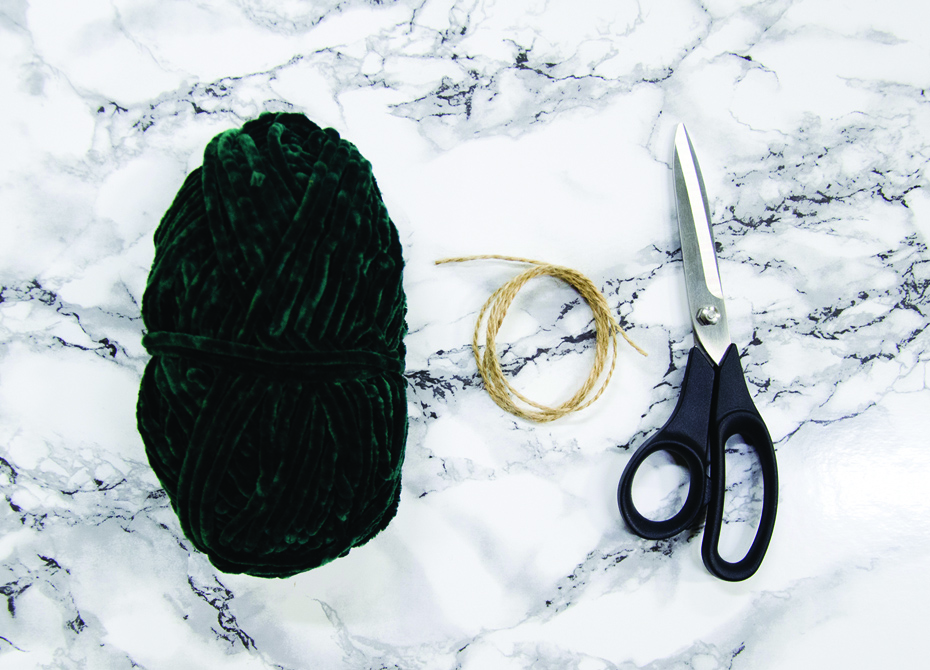
  • 1 ball of velvet-effect yarn, or another thick yarn of your choice

  • 8 metres of jute cord

  • 1 metal ring

  • Scissors or a rotary cutter

  • A small pot, vase, or cachepot to test the height of the plant hanger

Optional:
You can also add wooden or glass beads between some of the knots to personalize your plant hanger. Just make sure the hole in each bead is large enough for the cord or yarn to pass through.


Before you begin

In this project, the velvet-effect yarn and jute cord are worked together as if they were a single cord. This mix of textures creates a soft, natural, and decorative result.

The measurements suggested here are well suited to a small hanging planter. If you want to use a larger pot or create a longer hanger, plan for longer cords from the start.

You can also adapt this project depending on the style you want to create. Even though the version shown here is made with a mix of velvet-effect yarn and jute cord, macramé cord would also work beautifully for a more classic, clean, and even look.

You can also have fun mixing different materials: a DK-weight yarn paired with a textured yarn, a fluffy yarn for a softer effect, or even several DK yarn colours worked together to create a more colourful plant hanger. The important thing is to choose yarns and cords that are strong enough to support the pot while still being flexible enough to knot easily.


How to make a macramé plant hanger

Step 1: Cut the cords

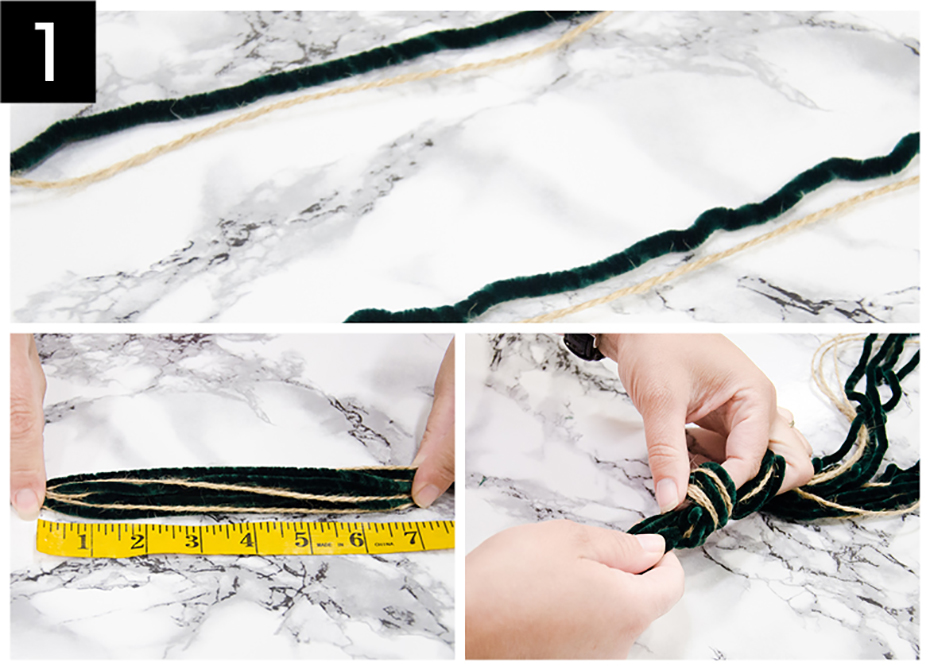
Cut 8 lengths of 100 cm, or 39 in, from the velvet-effect yarn.

Then cut 8 lengths of 100 cm, or 39 in, from the jute cord.

Gather the yarn and cord lengths together, then tie a knot about 12.7 cm, or 5 in, from one end.

This first knot will form the base of your plant hanger.

Step 2: Create the first knots

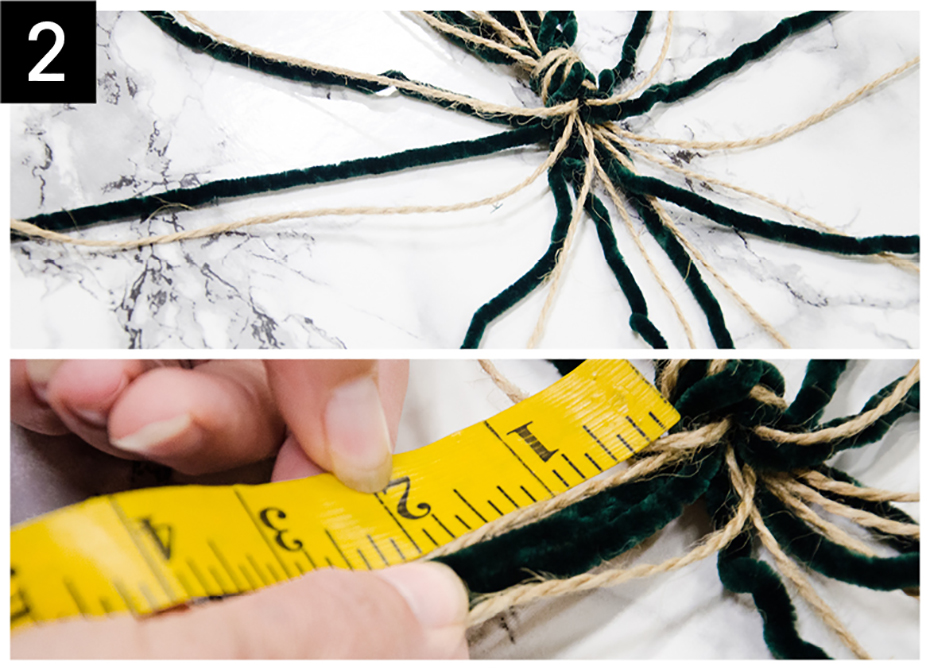
Arrange the cords around the base knot so they are evenly distributed.

Always work one length of yarn and one length of jute cord together, as if they formed a single cord.

Take 2 cords together and tie a knot about 5 cm, or 2 in, from the centre knot.

Repeat with the remaining cords to create pairs all around the base.

Step 3: Open up the structure

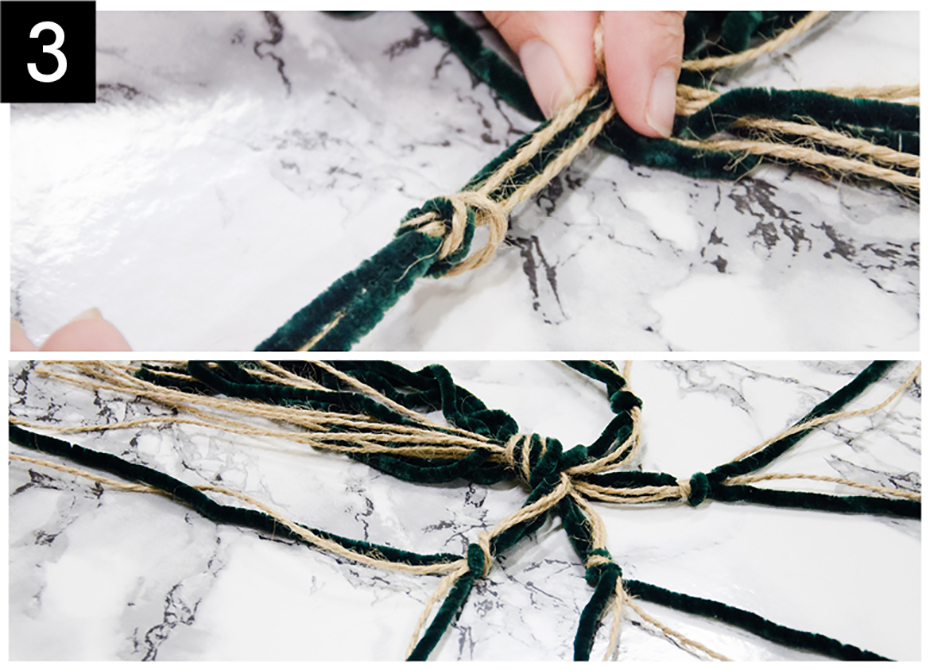
Gently pull on the knots to position them properly.

Then open the cords to space them evenly around the centre. This step starts to create the net-like structure that will hold the pot.

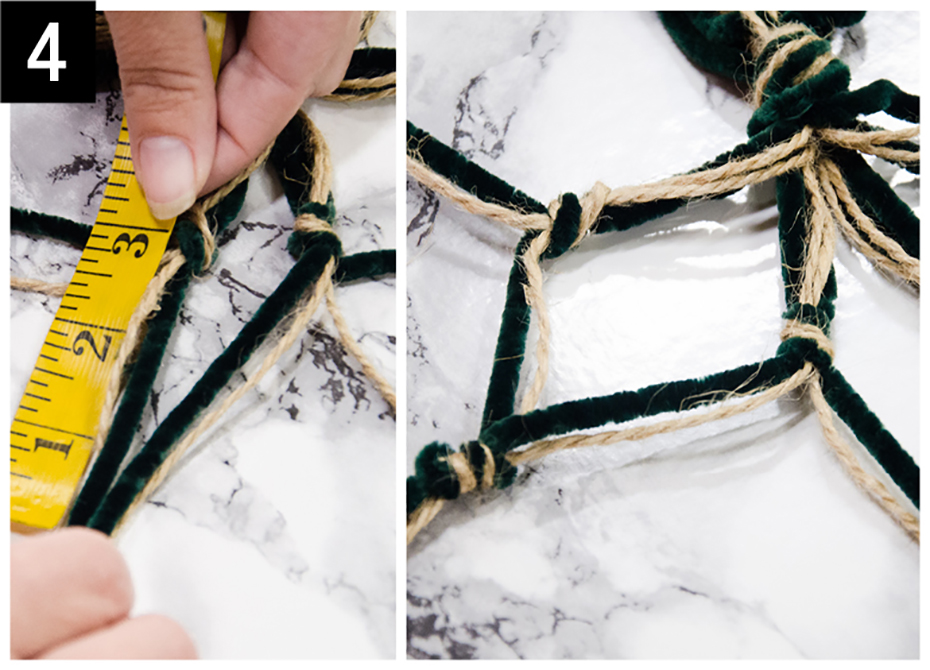
Step 4: Create the second row of knots

Take 2 neighbouring cords from two different groups.

Measure about 7.6 cm, or 3 in, from the last row of knots, then tie a new knot.

Repeat all around the plant hanger with the remaining cords. You’ll start to see the macramé structure take shape.

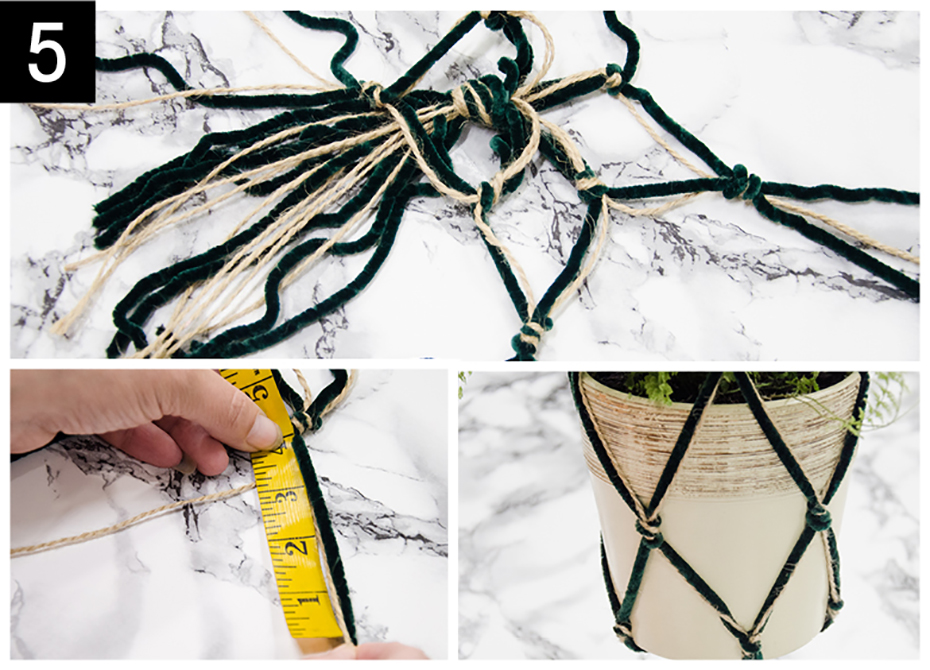
Step 5: Adjust the height of the plant hanger

Repeat the previous step, but this time, tie the knots about 10 cm, or 4 in, from the last row.

Then place the pot or vase inside the plant hanger to check the height and fit.

If your pot is taller, or if you want the plant hanger to wrap around it a little more, add another row of knots. In that case, increase the distance by about 2.5 cm, or 1 in, with each new row.

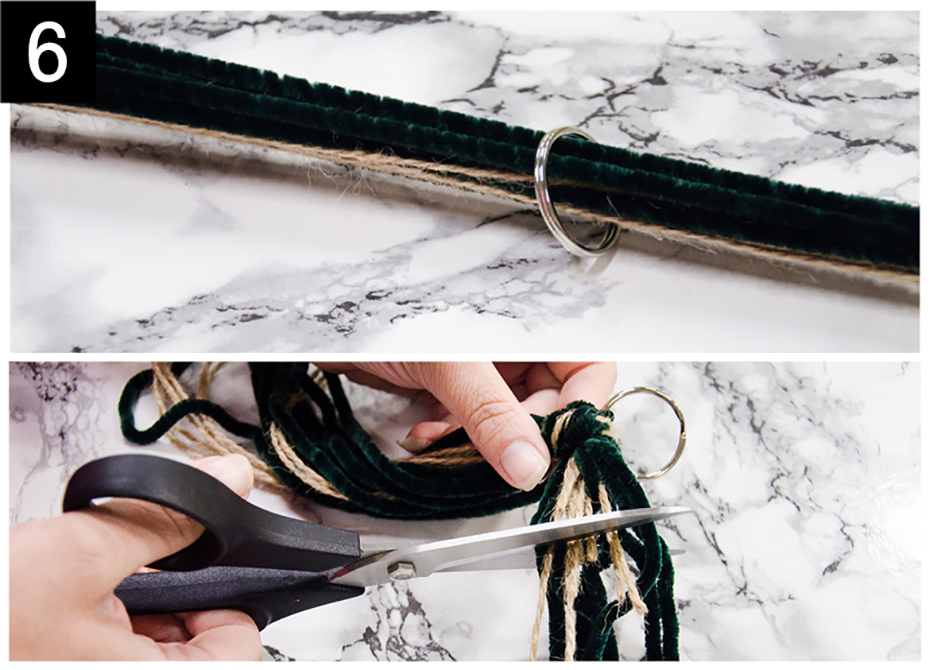
Step 6: Attach the ring

Once the height is set, gather the cords at the top of the plant hanger.

Pass the metal ring through the end of the cords, then tie a strong knot to hold it in place.

Trim the excess cord if needed.

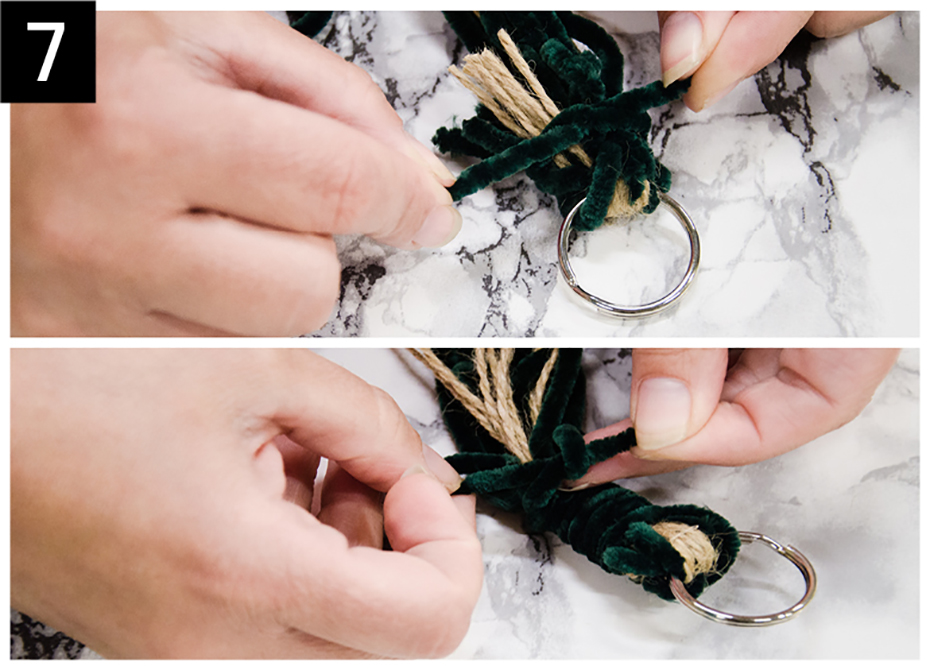
Step 7: Reinforce the hanger

Cut a cord measuring about 38 cm, or 15 in.

Tie this cord at the base of the ring, then wrap it a few times around the main cords. This helps reinforce the hanger while hiding the cords underneath.

Finish with a tight knot.

Before hanging your plant hanger, make sure all the knots are secure and that the ring can support the weight of the chosen pot.


Your macramé plant hanger is done!

Now all that’s left to do is place your favourite pot, vase, or plant inside.

This hanging macramé planter is perfect for adding a decorative touch to a window, shelf, reading nook, or even a workspace. Have fun playing with colours, textures, and accessories to create a version that matches your decor.


Tips for making a successful macramé plant hanger

For a more balanced result, try to keep an even distance between each row of knots.

If you’re a beginner, choose a fairly thick cord: it will be easier to handle, and the knots will be more visible.

Before trimming the excess cord, place your pot in the plant hanger to check the final height.

For a more natural style, jute cord is a great choice. For a softer or more colourful result, you can also use cotton cord or thick yarn.


FAQ — Macramé Plant Hanger

What cord should I use to make a macramé plant hanger?

You can use macramé cord, cotton cord, jute cord, thick yarn, or even a mix of textured yarns. Macramé cord is ideal for a more classic and even result, while jute cord creates a more natural and rustic look. Cotton cord offers a softer, more flexible finish.

Is a macramé plant hanger a good beginner project?

Yes. A simple macramé plant hanger is a great beginner project because it requires very little material and only a few basic knots.

How long does it take to make a macramé plant hanger?

For this model, plan for about 30 minutes. The time may vary depending on the size of the pot, the type of cord used, and your comfort level with knotting.

Can this tutorial be adapted for a larger pot?

Yes, but you’ll need to start with longer cords. The larger the pot, or the longer you want the hanger to be, the more length you’ll need at the beginning.

How can I make a macramé plant hanger stronger?

Tighten each knot well, choose a sturdy ring, and make sure the hanger can support the weight of the pot before hanging it permanently. For a heavier pot, choose a strong cord and avoid materials that stretch too much.


Comments
Leave a comment
Leave a comment
Loading...